1. If you’re an experienced Alexa Developer, you can enhance your existing skill by extending it to support the new language model for Canada.
2. If you’re new to Alexa then also no worry, first you need to “Create a new custom skill” then update your locality.
1. How to update your existing skill for Canada using the “New English (Canada)” language model.
2. How to update your AWS Lambda function, so your skill delivers the right content to your customers in each of the supported regions—all from a single code base.
1. If you wants, your skill delivers the “same content” to your customers in each of the supported regions- all from a single code base, then you need to follow the “Step-1 “.
2. If you wants, your skill delivers the “different content” to your customers in each of the supported regions- all from a single code base, then you need to follow the “Step-1 ” and “Step-2” both.
1. Go to Amazon Developer Portal and click on the “Sign In Button” (If already you have the Amazon Developer Account otherwise you can “Create” a new account).

2. Navigate to your existing skill list.
3. After entering to the skill click on “Go to Development”.
4. Click on “Add a new language” .(Here the skill already has two language models for English(U.S.) and English(India) .)
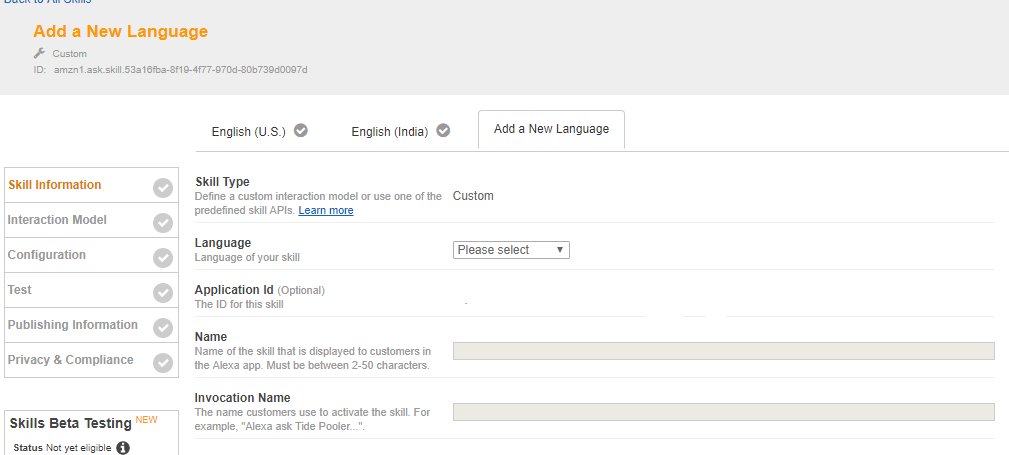
5. The steps complete the Skill Information tab.
a.Choose “English(Canada)” as language of skill.

b. Name: Give the skill name. (You can give same skill name or different skill name).
c. Invocation Name: Give the invocation name (By using this user will interact with your skill).
d. Then click on “Save “ and then click on “Next” for navigate to Interaction Model.v
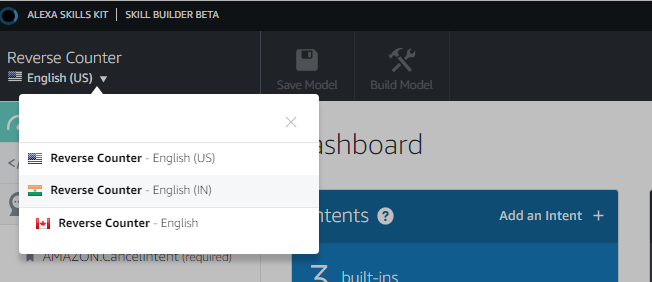
6. Launch the beta builder if not activated. We can do that by simply copying the interaction model from the US version of our skill and paste it in Canada Version. The steps are:
a. In Interaction model Switch to the US version by clicking on the language dropdown in the skill builder, and choose English (US).
b. Click on the “Code Editor”.
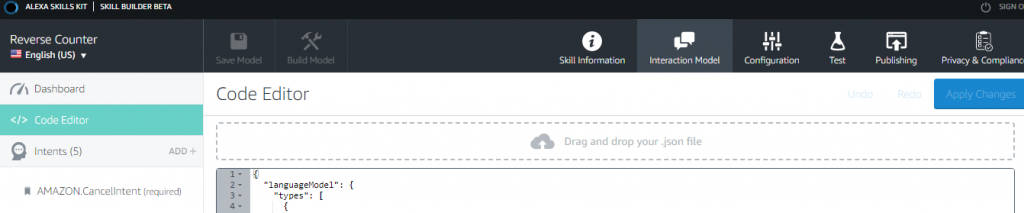
c. Select and copy the JSON in the code window. (Here all intents, sample utterances, and custom slot values are present.)
d. Then go to English (Canada) using the drop down from the step-a.
e. Click on the “Code Editor” and replace the existing JSON and paste the copied JSON code. (Also you can directly edit all the elements separately )
f. Click on the “Apply Changes” button.
g. Click on the “Save Model”.
h. Click on the “Build Model”.
If your interaction model uses any built-in slot types, you may need to make changes to ensure that the types are supported in the locale. For example, the AMAZON.US_FIRST_NAME is supported in English (U.S.), English (U.K.) and English (Canada). An equivalent first name slot type, AMAZON.FirstName, is available for English (India). See the Slot Type Reference for a list of slot types for each supported locale.
Once you have finished updating your interaction model for English (Canada), you need to customize the responses your skill returns for the different locales that you support. Do this by updating your Lambda function.
Now your skill is ready to support Canada region, you may want to update your Lambda function to ensure
that your skill provides different responses tailored to each supported region.
Let’s see the steps how to provide different output-
1. Set the language strings for each region.
As you can see, the languageStrings object contains four objects, one for each supported English language (en-US, en-GB, en-IN, and now en-CA). The object names are identical to the value of the locale property that is passed to our skill when it is invoked by Alexa. This tells us the language model the end user’s device is configured to use so that we can respond with the appropriate language.
You can see this in action by looking at the JSON request sent to your skill through the Service Simulator. When testing in the simulator, be sure you to select the tab for the language you want to test. In our example, when testing from the English (Canada) tab, the request sent to the skill includes the en-CA locale:

2. Enable internationalization for your skill using the Alexa Skills Kit.
3. Access the language strings in your code.
Now it takes to update your skill to be available for customers in Canada.
NectarSpot Inc. is an integrated digital marketing company specializing in Design & Development of Web, Mobile & Voice Applications.
Our award winning team excels in providing redesign, optimization, automation, and analytics services to companies at various growth stages.
Contact us today to get your project started.


Copyright © 2026 Website by NectarSpot Marketing, Automation, and Design Company